Sunday, April 25, 2010

How a Car Engine Works

A gasoline engine operates on the principle of combustion. A fuel/air mixture is pulled into a cylinder, the cylinder is then closed off and the piston is thrust upward to create compression. A spark is introduced to ignite the mixture to create combustion to thrust the piston downward in the engine block.

There are a number of pistons inside an engine depending on the design, 4 to 12 cylinders usually. The pistons are connected to a crankshaft through a connecting rod. Pistons fire consecutively to rotate the crankshaft inside the engine block. The oil pump pushes oil through the oil filter and then supplies oil to vital engine parts including the crank and camshaft, cylinder walls and piston rings, valve train, cam lifters and the timing gears or chain. Motor oil is used to lubricate and cool internal engine parts. Oil is pumped up through the engine, then returns to the bottom of the engine and is gathered in the oil pan.

Honda Engine
Over Head Camshaft Engine - 4 Cylinder (courtesy of beaudaniels.com)
The cylinder head is connected to the top of the engine block and allows air/fuel mixture and exhaust into and out of the cylinder block. The cylinder head has the duty of holding the air/fuel mixture charge inside the cylinder as it combusts, forcing the piston downward. The cylinder head is connected to the engine block using head bolts, using a head gasket to seal both parts. Over Head Cam Cylinder Head
Over Head Cam Cylinder Head
A camshaft is used to open and close intake and exhaust ports by using valve train components. These components will vary depending on the design of the engine. There are primarily two styles of valve systems: over head cam which consists of a camshaft and lifter, and the in block system which consist of a camshaft, lifter, push rod, rocker arm. Both styles utilize a valve spring to hold the valve closed.

Rapid Clicking Sound When Starter is Used

A common problem with a car battery is low voltage. As a battery ages it loses the ability to store electricity resulting in an insufficient flow of electrical energy to the starter. The starter is designed to operate on a high amperage 12 volt system. When a starter is subjected to low voltage or amperage (flow) it will cause the starter to engage and disengage rapidly producing the machine gun like sound. To fix this problem a battery inspection or replacement is needed. There are two reasons that a battery will not perform as it should, either the alternator has failed allowing the battery's state of charge to become weak or the battery has failed and replacement is required. Unfortunately to check the alternator the engine must be running, so you must either jump start your car or replace the battery to check the charging system. If the alternator output test is ok then the battery is bad and must be replaced. If while driving the charge light indicator on the dash was not illuminated and the battery is more than three years old the battery has probably failed.
Delco Car Battery
Delco Car Battery


Related Inspections
Check Battery Cable Corrosion - The battery cables are used to transfer electrical power from the battery to the starter. Battery acid causes corrosion inside the battery cable and will inhibit electrical flow. To check for this condition look for bulges near the top of the cable, these bulges indicate corrosion expansion caused by the chemical reaction between the acid and copper wire. Remove the failed battery cable to replace with new unit, then check charging system to ensure proper operation.
Inspect Battery for Bulging - The battery supplies electrical power to the vehicle, when a battery short circuits internally it can cause the car to lose power and gain it back again. Inspect the battery; if the sides are bulging it could have a warped plate that can short under certain conditions. To check for this condition the battery needs to be disassembled which is very difficult, and should not be attempted. This problem is rare but it does happen.

Engine is Leaking Coolant

Engine coolant is used to transfer heat from the engine to the radiator by the cooling system.  The radiator removes heat from the coolant by forcing air through the radiator
fins. Without coolant, your engine will over heat and if left unattended severe engine damage will occur.  Coolant colors can vary from green, orange, blue and yellow each having their own protective properties. Coolant leaks are common car problems; we have listed some of the most common causes below.
Red and Green Engine Coolant


Troubleshooting Procedure
Inspect the engine coolant level in the coolant reservoir tank; coolant level should be between the hot and cold marks. If the reservoir is empty the cooling system may have a leak. Always check the coolant level when the vehicle is cold, preferably over night.
USE CAUTION WHEN CHECK YOUR COOLANT LEVEL, ONLY CHECK LEVEL IN RADIATOR WHEN THE ENGINE IS COLD
Radiator Cap and Coolant Reservoir


A. Checking Water Pump. The water pump is used on the engine to circulate coolant from the engine to the radiator. The water pump is powered by the engine using a multi-ribbed belt or in some cases the engines timing belt. The main shaft in the water pump is used the support the drive pulley and the impeller. This pump shaft is supported by two bearings and sealed by a shaft seal. If the seal or bearings fail it causes coolant to leak from the inspection port in the water pump. The water pump must be removed and replace with a new unit. Replacement instruction varies from car to car for exact instruction consult an auto repair manual.

B. Check for Radiator Leaks. The radiator is used to remove the heat created by the engine from the coolant. Air is forced through radiator cooling fins either by car motion or by the cooling fan. This cooling fan can either be driven by the engine or an electric motor. Radiators are made from an aluminum core and two plastic tanks on either side. As a radiator ages the plastic tank will crack causing coolant to leak. To inspect for this condition use a flashlight to locate the radiator tanks. Inspect these tanks and the seal between the tank and the radiator core. If leakage is observed remove car radiator to replace with a new unit, refill with coolant and recheck the system. Radiator Coolant Leak
Radiator Coolant Leak
C. Inspect Coolant Hoses. Rubber hoses are used to transfer coolant from one part of the engine to an accessory like a heater core or the radiator. To inspect hoses for leakage start with the engine cold, check hoses for cracks, bulging or oil contamination. If a hose is discovered that exhibits any of these conditions replace the hose with a new unit. When repairs have been completed refill the cooling system and recheck. A cooling system service or flush will keep your vehicle's cooling system from becoming acidic. This condition occurs when chemicals in the coolant break down creating acid. This acid is very corrosive and will destroy cooling system components. Flush regularly and replace thermostat and refill system with manufacturers recommend coolant/anti-freeze.


Coolant Chemical Breakdown

To avoid this problem simply change your coolant more often than the recommended 100,000 miles. Change your coolant every 40,000 miles and you should be ok. All engine coolants must be replaced on a normal schedule to avoid the coolant changing its chemical base composition to an acid. This condition will cause the coolant to eat away at internal engine parts, seals and gaskets, causing premature engine failure and added expense. The coolant mixture to water should be about 60% coolant and 40% water  (distilled is recommended). Always add and check coolant level in the coolant reservoir when the vehicle is cold. Be careful of harsh chemical flushes because they can cause more damage than good, especially to aluminum heads, intake manifolds, and the engine block, read the warning carefully on the label.

How to Tune Up a Car Engine


Most vehicles have ignition systems and a throttle bore. The vehicle's ignition system is the component that ignites the fuel air mixture inside the combustion chamber. When an ignition system fails, it can cause various symptoms such as stalling, rough engine under power, service engine light (check engine) and complete engine shut down. Be sure to keep your vehicle's engine and fuel system clean to assure the proper operation of your vehicle. The step by step instruction below is characteristic of today's ignition and air intake systems. Most vehicles today need a tune up every 35,000 to 65,000 miles depending on driving conditions. Before starting determine which tune up parts are needed. Inspect the particular system on your car or truck then purchase the appropriate parts to complete the job.
READ COMPLETELY BEFORE STARTING!
Step 1 - Identify Throttle Bore (air intake plate and bore)

Cleaned Throttle Body
Most vehicles have an air intake system that will become clogged with air contaminants that the air filter cannot keep out of the system. This condition is called "coking" and can cause stalling as well as variable idle condition and poor mileage. The throttle bore in this illustration has been cleaned for visual purposes. Usually the throttle bore and plate are coated with a dark light tar that needs to be cleaned with every tune up.
Step 2 - Cleaning the Throttle Bore and Throttle Plate (air intake plate and bore)

Most vehicles have a throttle cable that can be held open to help with the cleaning procedure. Open the throttle bore and with a cleaning towel and cleaner, (rubbing alcohol works well) continue cleaning until the throttle bore and plate are clean.
Step 3 - Identify Tune Up Components

Most vehicles have two kinds of ignition systems. The first is DIS (distributor less ignition system) and COS (coil over spark plug) no spark plug wires. If you can't identify which system you have, follow this link to get the right system for your car (car repair manuals). Confirm your vehicle to determine the tune up parts needed. A typical tune up includes spark plugs, air filter, fuel filter, spark plug wires, distributor cap and ignition rotor. You must determine which parts are needed before you start.


Step 4 - Remove Plug Wire Retainer Guide

Remove the spark plug wires retainer clip(s). These are important in keeping the plug wires separated and controlled to avoid any contact with undesirable components (exhaust manifold, drive belts etc).  Clean and inspect the spark plug wire separators for reinstallation.
Step 5 - Remove Plug Wires

Remove the spark plug boot end and twist the boot to break the airtight seal created round the plug wire boot.  Then gently pull the spark plug wire from the spark plug. Remove the plug wire from the coil terminal. It is important to change the spark plugs and wires ONE AT A TIME to make sure you don't get the wires mixed up.  If you have already taken them all off at once and cannot get them back on correctly, visit this link for the proper engine firing order, car repair manuals
Step 6 - Matching to Replace Plug Wires

Remove all plug wires from the packaging, straighten them out and organize the plug wires from largest to shortest. Match up spark plug wires by length and reinstall one at a time.
Step 7 - Remove Spark Plug

Next, remove debris from the spark plug hole, (canned air works best) then use a socket wrench and spark plug socket to loosen and remove spark plug (counter clockwise). Inspect spark plug for damage.
Step 8 - Replace Spark Plug

Remove the spark plug from the box or container and inspect the new plug for damage that could have occurred in shipping. A spark plug has a porcelain isolator that is fragile and can crack easily.  Next inspect the spark plug gap using a spark plug gap checker. The "air gap" should be measured as per manufacturer specifications. Most plug gaps are between .035 and .045 thousands of an inch. This gap is important because it determines the amount of resistance used to "time" the system. An incorrect spark plug gap will result in poor running, low power, poor mileage and a check engine light notice. Reinstall the spark plug and install the new spark plug wire. Most of the time a spark plug will come "pre-set" and ready to install.  Continue the process until all spark plugs and spark plug wires have been replaced. Be sure to use OE (original equipment) parts for your car to insure the proper performance from your vehicle. This tutorial has outlined a tune up on a gasoline power engine, four cylinder 1995 Saturn SL1. Most gasoline powered cars and trucks are similar.


How Do I Repair My Car? / How Do I Tune Up My Car?
Required Tune Up Parts
Before starting determine which tune up parts are needed. Inspect the particular system on your car or truck then purchase the appropriate parts to complete the job.
 Spark Plugs Spark Plugs - A spark plug will last between 20,000 and 60,000 miles depending on the style of spark plug that is required by your specific vehicle. The spark plug is the firing point in which the electricity is passed through a gap to ignite the fuel/air mixture inside the engine (combustion chamber).
 Spark Plug Wires Spark Plug Wires - Spark plug wires need to be changed every time a tune up is performed. With today's ignition systems, the running voltage and amperage is higher than ever; even more reason to service your spark plugs wires before they burn out and cause a misfire.
 Ignition Rotor Ignition Rotor - An ignition rotor is used to relay the electrical spark from the ignition coil to the terminals on the distributor cap and then onto the sparkplug wires and eventually to the spark plugs. Some cars and trucks do not use an ignition rotor so inspect your vehicle before you start.
 Fuel Filter Fuel Filter - Fuel filters will last up to 25,000 miles or more depending on the type of driving you do. If you live in a dusty area like the desert or if there is extreme moister in your area, you can expect to change your fuel, oil and air filter more often. Make sure to replace your fuel filter at regular intervals to insure the safety of your vehicles fuel injection system.
  Distributor Cap - A distributor cap is the component that allows the ignition spark from the ignition coil and separates it into the individual spark plugs as it rotates inside the ignition distributor. Some cars and trucks do not use an ignition rotor so inspect your vehicle before you start.
 Air Filter Air Filter - Air filters will last up to 3,000 miles or more depending on the type of driving you do. If you live in a dusty area like the desert or if there is extreme moister you can expect to change your oil and oil filter's more often. Make sure to inspect your oil level at regular intervals to insure the safety of the internal parts system of your vehicle. To inspect or change your air filter follow the instructions above.
Oil Filter Oil Filter - Oil filters will last up to 3,000 miles or more depending on the type of driving you do. Different oil types, like synthetic, give you more mileage between services. If you don't know when the last oil change was on your vehicle and would like to determine where you stand, remove the oil level inductor and check the clarity of the oil. If it is light colored like tea, you are ok. If it is dark like Cola, it is time for service. We recommend top quality oil filters and motor oils for your car or truck.

How to Jump Start Car Battery Using Jumper Cables

READ COMPLETELY BEFORE BEGINNING!
When a battery is dead a jump start is needed to troubleshoot the reason the battery went dead. A dead battery condition can range from a car door left open to the headlights being left on overnight. Low battery voltage is a common car problem. As a battery ages it can lose the ability to store electricity resulting in an insufficient flow of electrical energy to the starter. The starter is designed to operate on a high amperage 12 volt system, when a starter is subjected to low voltage or amperage (flow) it will cause the starter to not operate. To jump start your car battery use a good quality jumper cable set. Inexpensive cables do not work as well because a higher gauge wire (smaller diameter) is used in the construction restricting the current flow from battery to battery.
Battery Jumper Cables
Basic Battery Jumper Cable Instructions
  • Park the car that will be used as the jumper vehicle near enough for the jumper cables to reach to the front of the car that is going to be jumped, and shut off engine. (or were the battery is located, most vehicles are located in the front, under the hood)

  • With the engine off open the hood on both cars and connect the red jumper cable connector on the positive (+ red) side of the battery of the car that has the dead battery. Once the jumper cable end is attached slightly wiggle the jumper connector back and forth to assure a good electrical connection. Next repeat this procedure to the battery in the jumper car so both red jumper cables are connected to their respective batteries. (Do not allow the black and red cable ends to connect at anytime)

  • Then attach the black connector of the jumper cables to the negative (- black) terminal of the car with the dead battery. Next, attach the remaining black jumper cable connector to an engine accessory bracket such as an alternator or air conditioner compressor mount away from the engine belt system. The reason we do not connect the last connector at the negative battery terminal is to avoid sparks at the battery. Sparks on or near the battery can cause the battery to explode. While explosions are rare they will more likely occur to a battery that is low on charge or a battery that has just been charged this is why the final circuit connection is at an engine ground source.

  •  Next, step back from both hood areas of both vehicles. With all the accessories turned off and both cars gear selectors in park with the emergency brake on start the engine of the jumper car (car with good battery) and allow to idle for about 5 minutes. Then, manually increase the engine speed to a little faster than idle speed (about 1500 RPM) by holding the accelerator down slightly for about 10 minutes. You are creating a charging system for the dead battery by the alternator of the car that is running.

  • Next, crank over the car's engine with the dead battery, it should crank over and start. Once the engine has started manually increase the engine speed to about 1500 RPM and hold for about 10 minutes. While the car that had the dead battery is running shut off the engine of the jumper car, and remove the black jumper cable end. Then, carefully remove the back jumper cable connector from the now charging dead battery. Next, remove the red jumper cable connector from the jumper car and close the hood. Finally, remove the remaining jumper cable connector and close the hood.

  • While the dead battery car is running inspect the charge inductor light on the instrument cluster. If it is illuminated the charging system is having a problem and needs to be checked. If repeated jump starts are required and the charging system has check out ok the battery has failed to hold a charge or there is an electrical draw in the system.

  • If you have followed this procedure and the vehicle still has not started the battery may have failed (shorted) internally and cannot be jump started or you have a failed battery connection and further troubleshooting is required.

How to Change Engine Oil and Filter

Normal oil and oil filter change service is mandatory for long engine life. Today's engines have more power which makes it imperative that you change your oil at regular intervals; every 3,000 miles or 3 months, whichever comes first. If your car uses synthetic motor oil you can extend mileage between changes up to 2,000 additional miles. Always use your manufacturer's specific weight motor oil. This information is in your owner's manual or a car repair manual. Also use an OEM or better style of oil filter to maximize engine life.
Step 1 - Locate and Remove Oil Filter Oil Filter


To change your motor oil and filter, first locate the oil filter. It is usually located around the oil pan of the engine. Remove the oil filter by turning it counter clockwise with a large locking wrench or an oil filter removal wrench. (Always wear protective gloves and eyewear when replacing.)
Step 2 - Drain Oil Filter and Inspect Sealing Gasket

After removing the oil filter, let it drain into the oil drain container. Then clean oil filter seal surface on the mounting flange on block, make sure the old oil filter's sealing rubber gasket is off the mounting surface for the oil filter seat. On the new oil filter install a small amount of motor oil onto the rubber gasket of the new oil filter. Then reinstall new oil filter by turning it clockwise until tight. (Note: only tighten oil filter by "hand") (Gloves suggested)
Step 3 - Removing the Oil Pan Drain Plug
Drain Motor Oil
Next, remove the oil pan drain plug. Using a wrench turn the drain plug counter clockwise. Be ready to grab the oil drain plug as it becomes dislodged. (Gloves suggested) Note: Always use the boxed or completed end of the wrench to avoid rounding of the drain plug hex. A socket wrench is also acceptable.
Step 4 - Drain Engine Oil

Once the drain plug is dislodged inspect the sealing washer on the plug, if worn, broken or the integrity of the seal cannot be maintained replace the plug washer with new. Let oil drain completely, reinstall oil drain pug and wipe clean with shop or paper towel. Note: drain plug just needs to be "snug" - not too tight.


Step 5 - Adding Engine Oil

After the oil has been drained out of the engine and new filter installed add motor oil to the engine oil fill port, this is usually located in the valve cover of the engine and is marked "add engine oil" on the cap. If the oil fill is in a difficult position you can use a funnel to help guide the oil. (The oil cap is upside down in this picture to prevent oil drippings) Most car and light trucks will take four to 5 quarts to fill to capacity. First add four quarts and reinstall the oil fill cap. Then start the engine and let run for 1 minute then shut off the engine and let stand for 2 minutes to assure all oil inside the engine is in the oil pan for proper measurement.
Step 6 - Checking Engine Oil Level

After you have run your engine, let stand for two minutes, then remove the oil dip stick level indicator to inspect oil level (the new oil in this photo has been darkened for visual effect, clean oil is difficult to see in photos) make sure the oil level is between specified lines on the indicator, add as needed to obtain proper oil level. If you don't know when the last oil change was done on your vehicle and would like to determine where you stand remove the oil level inductor and check the clarity of the oil. If it is light color like Tea you are ok, if it is dark like Coke it is time for service. We recommend top quality oil filters and motor oils for your car or truck. In the course of driving 3,000 miles, an inferior style oil filter will allow carbon partials to stay in your engine, causing premature wear and possible catastrophic engine failure.

Mass Air Flow Sensor

The mass air flow sensor (MAF) is used to monitor the amount of air going into the engine while running. Mass air flow sensors work in conjunction with the oxygen sensor and the engine control system to maximize performance and economy. A vehicles mass air flow sensor delivers a signal to the PCM (engine control module) telling the amount of air coming in, this is compared with oxygen levels in the exhaust to determine the efficiency of the engine. It is usually difficult to detect when a mass air flow sensor fails, the "check engine light" or engine symbol will probably not be illuminated. Your car, truck or SUV may have a poor idle quality, stall, low power or all three. Your PCM may have no trouble codes because the PCM cannot detect a problem since the sensor is working but is out of range.

Mass Air Flow Sensor


What has occurred with most MAF failures is the sensing element or "hot wire" that is used to give electronic feedback to the PCM for processing has become contaminated by air particulates. The mass air flow sensor is reporting to the PCM that less air is running through the engine than actually is. The PCM will then lean the fuel mixture down to the point that it will cause performance issues. There is not enough variance in the system to trigger a MIL "Check Engine" light so this particular repair problem can be difficult to detect through normal troubleshooting methods.
A mass air flow sensor is most common in newer vehicles, this sensor is used to help maximize efficiency and reduce emissions. One of the benefits of the mass air flow sensor is that it can respond to changes in air intake flow. There are no moving parts in a mass air flow sensor. Most vehicles mass air flow sensor locations are in the air intake for the engine, this allows easy replacement. It is recommended that the sensor be replaced approximately every 60,000 miles.

Car Repair Article - READ COMPLETELY BEFORE BEGINNING

All engines run on an optimum fuel to air mixture called "stokiometric" which means chemically balanced. This balanced fuel to air ratio is 14.7 to 1, 14.7 parts air to 1 part fuel. The oxygen sensor is created using the active chemical such as zirconium, electrochemical (also known as Galvanic), infrared, ultrasonic and very recently laser. When a lean mixture code is detected by you or a technician the first tendency is to replace the oxygen sensor. The best way to check the operation of the sensor is to run a simple test. No matter if your engines oxygen sensor has one wire or four there is only one sensing wire that feedbacks information to the PCM. To find this wire you will need a car repair manual. If a trouble code is present that pertains to an oxygen heater sensor failure, replace the sensor to repair the problem. An oxygen sensor must be warm before it will operate properly.
Warning: If a malfunction exists with related components such as an engine misfire or engine vacuum leak do not perform this test. The oxygen sensor is designed to operate within a particular range, if this range is exceeded the sensor will give the appearance that it has failed.

Oxygen Sensor
GM Oxygen Sensor - (appearances will vary)
Oxygen Sensor Test
Tools needed to perform these tests: Voltmeter
  • Step 1 - Once the oxygen sensor sensing wire has been located connect a volt meter to the feedback wire and ground. Select the millivolt operation on the meter.
     
  • Step 2 - Next, start and run the engine at idle until warm (about 15 minutes). Observe the voltmeter; it should bounce slightly at whatever voltage the sensor is centered at (about 150 millivolts).
     
  • Step 3 - Continue to observe the meter and have a helper rap the throttle. The meter should drop for a split second as the mixture leans out in the first milliseconds of the throttle bore being opened. Then quickly rise for a spit second as the throttle closes and the mixture richens. The volt meter should stabilize at the original operating voltage when the engine returns to idle

How to Check a Fuel Injector

READ COMPLETELY BEFORE BEGINNING:
Check for Fuel Injector Malfunction. When a fuel injector malfunctions it can allow excess or no fuel into the engine. The fuel injector is manufactured with a control valve that allows fuel to flow at prescribed amounts. If this valve sticks open it will flood the cylinder with fuel. If the valve sticks closed no fuel is allowed into the engine cylinder. Excess fuel causes black smoke from the exhaust. On the flip side if the injector is stuck closed the absence of fuel will cause the cylinder to go lean effectively fooling the oxygen sensor and causing the system to allow too much fuel into the engine through the remaining fuel injectors. Injectors can malfunction at anytime without warning. Using a few basic tests you can determine if one or more fuel injectors have failed causing the engine run-ability problem.


Fuel Injector
Fuel Injector

  • While an engine is running you should be able to hear each injector clicking as the electronic valve opens and closes. To aid in this inspection use a stethoscope and touch it against each injector.
     
  •  Remove the injector electrical connector, turn the key to the on position without starting the engine. This test will tell you if the computer has proper system voltage and injector trigger signal. Remove an electrical connector from a fuel injector. Probe both sides of the connector with a grounded test light or multimeter (voltmeter). Set the voltmeter to DC voltage. Have a helper turn the key to the "on" position without cranking the engine and observe. The test light/voltmeter should illuminate/read one side of the connector. The multimeter should read about 12 volts. Next, switch the test light or multimeter (voltmeter) lead (black) or to the positive side of the battery to test the system ground injector trigger. Disable the ignition system so the engine will not start (disconnect ignition coil or remove the ignition fuse). Probe the side of the connector that did not light up in the previous step, have a helper crank the engine over and observe the test light, it should blink on and off or the multimeter (voltmeter) should bounce from 0 to 12  volts. (Note: if no injector pulse is present try disconnecting the remainder of injectors and re-test, if a fuel injector is shorted it can shut down the injector driver causing no injector pulse. If injector pulse returns plug the injectors in one at a time until the pulse fails. Replace effecting injector). If this test is positive and the injector still will not operate the injector has failed and replacement is required.
  • While the injector wire connector is off, test the fuel injector windings by setting the multimeter (voltmeter) to ohms and attach the leads to either side of the injector. Your reading will vary depending on manufacturer. For the exact ohms reading a car repair manual is needed. Test all of your injectors; if one injector reading is considerably different from the others replace the different injector.
  • Check the fuel pressure regulator, remove the vacuum line feeding the fuel pressure regulator, check for the presence of fuel, if fuel is present the diaphragm inside the regulator has ruptured and is feeding raw fuel into the engine causing it to run rough.
Common Problems:
  • A fuel injector is subject to high temperatures that can cause the injector to short circuit. Each injector has specific ohms of resistance reading that can be tested. This ohms reading can be found in a car repair manual. Temperature will cause readings to vary slightly. Injectors should be tested hot and cold. This is necessary because the heat or cold can create a condition that can short circuit the injector.
     
  • Moisture can cause the injector connection to short circuit. Always inspect and clean all electrical connections at the fuel injector.


Flywheel/Flex Plate

Every vehicle on the road has a coupler between the engine and transmission, for an automatic transmission this is called the flex plate, for a manual transmission it is called a flywheel. This article will explain the difference between the two, what they do and hopefully everything else you will need to know about them. A flex plate is what connects the engine to the automatic transmission in a vehicle. It is basically a piece of thick sheet metal that bolts to the end of the crankshaft and to the torque converter. They are made of a thinner material than a flywheel to allow for expansion of the torque converter at higher engine rpms, thus the name “flex plate”. Some flex plates have a toothed ring on the outer edge for the starter to engage with, others have the toothed ring on the torque converter. flex plates are engine specific items due to the fact that some engines require external balancing to smooth out vibrations, these flex plates will have a weight welded to it somewhere, others will not. If these are mixed up, the engine will have a serious vibration that could actually cause internal engine damage if left unchanged.
Engine Flex Plate
Engine Flex Plate
flex plates have been know to crack and or break for no particular reason, if your vehicle makes a chirping/light knocking noise just off idle in gear, you may have a cracked or broken flex plate. If you suspect this, some transmissions have a removable inspection cover that will allow enough access to see if there are any cracks (Look for rust, this is a sign of a crack), but unfortunately most of the time the transmission must be removed to gain access to see if it is indeed cracked/broken.
If your vehicles flex plate does need to be replaced, use a high quality OEM (Original Equipment Manufacturer) part or the equivalent, a cheap one may not be made of a high quality steel or could cause starter alignment issues. Always match up the old one to the new one before reassembly to assure they are the same diameter and that the torque converter and crankshaft bolt holes line up properly. The crankshaft mounting holes are usually “Timed” which means that they will all only line up in one spot, so you may have to rotate the flex plate a few times to get them all to line up to verify it is the correct flex plate for your vehicle
Engine Flywheel
Engine Flywheel
If your vehicle has a manual transmission, then it uses a flywheel instead of a flex plate. Flywheels are much heavier than a flex plate, this is due to the lack of a torque converter which is what helps keep the engine from stalling or bogging down by using its weight to maintain the inertia of the engine at low rpms. Flywheels come in different weights depending on the application. A lighter flywheel would be used in high-performance applications where higher rpms are the norm, a heavier flywheel is used in trucks and other low rpm applications where you need the extra help just off idle. Heavier flywheels also make the transition between gear shifts smoother by maintaining the engines inertia which decreases the jerking motion felt when letting the clutch out.
The flywheel is where the clutch assembly mounts and is the contact/friction surface for the clutch disk. Whenever a clutch is replaced in a manual transmission vehicle the mating surface on the flywheel needs to be resurfaced and measured to be sure the thickness is within specification, otherwise the flywheel can crack and even break in extreme cases. Flywheels are where the toothed ring is mounted for the starter motor to engage. In certain applications this ring can be replaced instead of replacing the entire flywheel when the teeth become damaged. If you need to replace your flywheel, always use a high quality replacement part such as the OEM (Original Equipment Manufacturer) parts. They will fit right and perform better than less expensive aftermarket products.

Car is Making a Popping or Pop Noise

If your car is creating a popping noise it means a component has failed or is failing, there is no "normal" popping noise. There are several systems that can make a popping noise such as a heater blend door actuator. Popping can also be generated from a suspension component such as a sway bar link that has become worn and has excessive clearance. These popping sounds can be created either when the car is moving or standing still depending on the system that is generating the noise. Sometimes just turning the ignition key to the on position can begin the popping sound and occasionally a car can pop just sitting in one place. Other pop sounds are created when a system is engaged and then stops when the system is switched off such as an air conditioner system. While still other popping noise are created when the car is driven in curtain conditions such as a bumpy road or at a particular speed. We have list common problems below:
  • Inspect Shocks or Struts - The strut or shock in your car is designed to dampen unwanted vehicle motion. If these components become loose or leak they came create popping, banging and rattling noises. To check for this condition inspect the mounting bushings and connecting bolts making sure they are tight and in good condition. Also inspect the shocks or struts for leaks, if oil is detected replace the component with a new unit.


    Front Strut Leakage
     
  • Check Sway Bar Mounts - The sway bar or bars, (some cars have front and rear sway bars) on your car are designed to prevent the car from rolling (leaning) when cornering. These sway bars are mounted to the frame and connected to the suspension arms using connecting links. If either the sway bar mount or the connecting links becomes worn or lose it will generate a banging, popping or rattling sound. To check for this condition check the mounting bolts and bushings, retighten or replace as needed.

  • Checking Drive Axles - Front wheel drive cars utilize front drive axles with CV (constant velocity) joints. When CV joints start to wear they will bind up on acceleration, especially in a turn. This causes a popping sound in the front suspension that transfers to the vehicle. Remove drive axles and inspect flexibility of each CV joint. If a bind or hard spot is observed the CV Joint/Axle needs to be replaced. Front Wheel Drive Axle
    Front Wheel Drive Axle
  • Inspecting Tie Rods - The tie rods connect the steering to the spindle which is attached to the rim and tire. These tie rod ends have a ball joint at one end and threads on the other. When the universal or ball joint wears it can cause popping or ticking sounds. Check the tie rod end for wear and replace as needed. (note: car realignment is required when replacing suspension components)
     
  • Checking Control Arm Bushings - The control arm bushes are designed to allow the suspension arms to pivot near the frame mount. These bushings are constructed of two metal collars, one large and one small with rubber molded inside the larger collar holding the smaller collar inside. Control arm bushings help prevent road vibration from being transferred to the car frame. With time and usage the rubber inside the bushings can deteriorate allowing the suspension arm to rattle and make bumping sounds. To check for this condition use a flashlight to view the upper and lower control arm bushings. If any rubber is missing or pushed out of the side of the bushing it must be replaced. Control arm bushings are sometimes serviced by replacing the whole suspension arm. To replace the suspension arms or bushings a car repair manual is needed for exact procedures, every car is different (note: car realignment is required when replacing suspension components)
     
  • Check Engine for Over Heating - Engine coolant is used to transfer heat from the engine to the radiator; if a coolant leak is present the engine will eventually overheat. When a engine is overheating it can create a popping noise. Never check the coolant level when a engine is hot. Always check the coolant level when the engine is cold, preferably over night. After the engine has cooled off inspect the engine coolant level in the coolant reservoir tank; coolant level should be between the hot and cold marks. If the coolant level is not between the reservoir marks the cooling system may have a leak. - Engine Coolant Leaks

    Radiator Cap and Coolant Reservoir
    Radiator Cap and Coolant Reservoir

S-10 Thermostat Replacement

S-10 Thermostat Replacement

Category: Auto Tuning 
4.3 vortec
  This vehicle is overheating. The temperature would climb slowly so the first logical thing to replace is the thermostat. A thermostat is not very expensive and is much easier to change than a water pump. They can be tested by boiling water and seeing if it opens. Due to the low effort and price its normally easier to just replace it. This vehicle is a GMC sonoma/ chevy s 10 with a 4.3 liter v6. Changing a thermostat is almost the same on any vehicle though, so dont be too concerned about what vehicle it is.
(Full Articl

Miata Catback Exhaust Swap

Category: Auto Tuning 
new miata muffler
 This is an aftermarket catback exhaust swap on a 1996 mazda miata as shown to the left. All exhaust swaps will be similar with only small differences. Reasons for an exhaust swap can be a leaking stock exhaust or maybe just to have an increase in horsepower.  Another good reason to replace the stock exhaust with an aftermarket one is the material used in aftermarket catback exhausts. The material used is generally stainless steel which will never rust as a stock one will. Horsepower increases will vary depending on the stock systems flow and if the engine is turbocharged or naturally aspirated.
 

Saving Gas by Improving Mileage

Category: Auto Tuning 

If you can’t get or afford the price of gas and your fuel gauge looks like this often, you might want to try some different ideas to save gas or improve mileage. First always make sure your car is running as good as it can. This can be done by performing a tune up which generally consists of spark plugs, plug wires, air filter, fuel filter, and distributor cap and rotor if applicable. If you have a fuel injected car and the check engine light is on you may have a problem that is costing you a lot of extra fuel. The car will then be running in a “limp” mode which usually consists of using extra fuel for the safety of the engine. Things such as the oxygen sensor (o2) will cause the engine to use extra gas also

Why cars break down ?

Nothing lasts forever; any car eventually will start having problems. However, while some cars may provide you with few hundred thousands miles of trouble-free driving, others start having problems from the beginning. Why there is such a huge difference?
Sometimes cars start having problems after accidents. Sometimes it may be a factory defect or design flaw. Heavy conditions like, for example, driving only short trips without letting the engine to warm up fully also make the engine life shorter.
Corrosion is another factor - for example, park the car for a few months in place with high humidity and later it will probably have more problems than the vehicle driven all this time on daily basis.
Yet, lack of maintenance is one of the most often reason for a car to break down.


Here is a visual example:
Compare these two images: the engine on a top photo hasn't been maintained well. Looks like it the engine oil hasn't been changed for long time. This engine has relatively low mileage and already needs serious and costly repair. The engine on the lower photo has been maintained well. After 175,000 miles (281,000 km) it's still in a very good condition, and needs no repair at all. Can you see the difference?
So, what's most important to keep your engine in a good shape?
- I guess, I won't say something new stating that regular oil changes is most important factor to keep the engine running. If you do it more often than suggested by manufacturer's schedule, that's even better.
- Avoid overheating the engine
- Changing spark plugs, air filter, timing belt and other items from maintenance schedule may save you from costly repairs.
- Fix any small problem right away before it causes a serious damage.

Thursday, April 22, 2010

Things you should know before going to check a used car

When buying a used car, without a doubt, first check a car history records. Some cars may have been flooded - worthless to buy. Others were written off by insurance due to serious accident. Many cars have altered mileage, and so on.
Follow this link to learn more How to check a used car VIN history report
If looking at the used car you noted any problem with the engine (e.g: major oil leak or strong noise) or any abnormal behavior don't let the salesperson to mislead you. They may tell you, for example, that the leak is "overflow from the recent oil change" or "the noise will disappear later by itself or something like this". Generally, such defects never disappear by itself. If you have hesitation, move on - there are so many cars available.
Ask for service records if they are available. Look for oil change intervals - was the oil changed regularly? I mean driving 1,000 miles over suggested oil change interval won't cause a big damage, but, for example, 9,000-12,000 miles (15,000-20,000 km) without an oil change may cause serious engine problems in the future.
Keep in mind, that modern engines, especially those with turbo charger are extremely sensitive to the oil change interval


How to check the oil

Park the car on a level spot, turn the engine off and set the hand brake. Locate the engine oil dipstick, pull it out, wipe it off with clean cloth and insert it back. Pull it out again and have a close look. If you've never checked the oil level before, follow this link for detailed guide How to check engine oil.
If you find the oil is completely black (although for the Diesel engine black oil is normal) and (or) the oil level is very low (left picture) - suspect excessive oil consumption and (or) lack of maintenance. In either case the engine will more likely to have problems in the future. Another sign of poor maintenance would be dark stains (carbon deposits) covering the oil dipstick along its length.
Well maintained engine will more likely to have cleaner oil and the proper oil level (right picture), although this doesn't necessarily mean that the engine is in good shape; the oil just could have been changed recently.


Look for leaks

Look for possible oil leaks. If the engine looks very clean and shiny it doesn't mean it has no leaks. Probably it has been shampooed. Most of the dealers shampoo the engine before putting a used car for sale. But there is the trick - look underneath the vehicle using your flashlight. Check the lower part of the engine and transmission. Everything has to be dry. There might be slight wetness which is not that bad, but there should be no leaks. See any leaks? Oil drops on the parking space? - this may indicate a problem.
Note, the water condensations dripping from air conditioner drain tube is normal. This drain tube is usually located on the passenger side of the firewall.


If it's possible, look at the internal parts through the oil filler neck (Don't open the oil cap while the engine is running!)


With the engine turned off, try to open the engine oil cap and look inside through the oil filler hole. Use a small flashlight. If it's possible to see any internal parts there, check their condition. What you are looking for is the oil sludge - this thick black buildup on internal parts you can see on the lower photo (this is how the sludged up engine looks inside, with the valve cover removed). If you see a lot of black oil sludge buildup inside the engine it means that either the engine oil hasn't been changed for a long time, or the engine has been overheated, or poor quality oil was used.
In either case, avoid buying such a car - sooner or later it will have serious engine problems.
Well maintained engine usually looks pretty clean inside; if you check few cars of the same model it's easy to see the difference. However, again, if the engine looks clean inside it doesn't mean that it has no other possible problems - as a last step, have the vehicle inspected by a mechanic of your choice.


If you find evidence of badly made repairs, avoid any such car.

If you find evidence that the engine has been repaired with inaccuracy (too much bulging of gasket maker, as in the image, loose bolts, stripped treads, altered wiring, broken fastenings, missing bolts or covers, etc.), avoid buying such a car because quality repair is possible only by very skilled mechanics. Just imagine how the engine has been repaired on the inside if it looks this way on the outside?
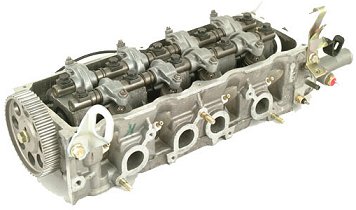

Timing belt

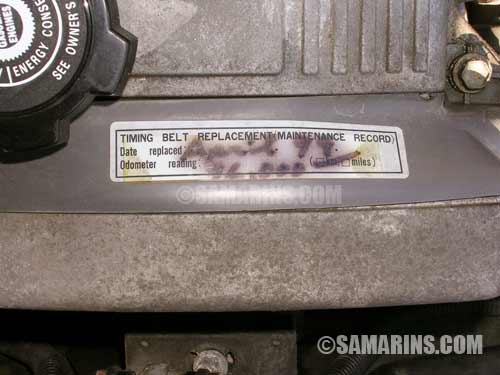
Many cars, especially with four-cylinder engine, have a timing belt that needs to be replaced at a certain interval - usually between 60,000 and 100,000 miles (100,000 and 160,000 km). If it wasn't replaced by the previous owner, you will have to do that. It's difficult to check it on the car because the timing belt is protected by the protective covers. The only way is to ask the previous owner if they have a receipt. Sometimes though, dealers place the timing belt replacement sticker somewhere on the top of the engine (see the picture) that indicates the date and the mileage when the belt was replaced.


Check the smoke

Blue smoke at start-up may indicate engine problems - avoid such a car. Black smoke means the engine consumes too much gas - possible problem with fuel injection.
Normally, there should be no smoke at all (Diesel engine may have slight black smoke at a cold start - it's normal). A small amount of white water steam and water condensate dripping from the exhaust is normal.


Listen for noises when the engine is running

There shouldn't be strong noises, coming from the engine under any condition with no matter is the engine cold or hot. By the way, knocking or tapping at a cold start is one of the indicator of poor maintenance. Knocking, tapping or rattling noises indicate excessive wear of internal engine parts. Whistling may be caused by loose belt. If the engine makes too much noises, avoid buying such a used car (however, Diesel engines are always more noisy, it's normal).


Look at the instrument panel

There should be no warning lights such as "low oil pressure", "low oil level", "overheating", "check engine" or "service engine soon" etc. on the instrument panel when the engine is running.
I receive lot of questions about "check engine" or "service engine soon" light. You may find the explanation what "check engine" means in the article Why my "check engine" light is on
If the car has "check engine" or any other warning light coming on while driving, have the proper diagnostic done before deciding to buy the car; in some cases the problem could be very costly to repair.


Test drive

Try to test drive a car for as long as you can. Try to accelerate, decelerate, take it on the highway if it's possible. The more you drive, the more chances you discover possible problems. If it's your first car, try to test drive few different cars of the same model to have better idea. If you feel anything that may indicate possible engine problem (e.g vibrations, stumbling, misfiring, delay during acceleration, rattling noise, smoke, rough idling, etc.) avoid buying such a car. If you have any hesitation about the way the car drives, shop around, there are plenty of used cars available. Sometimes a sales person may try to push you to buy a car today and now because "tomorrow I won't give you this price" or "I have the customer who will buy this car tomorrow" - Don't rush, take your time to think, the more you shop around, the more chances to find the right car for the right price.


Mechanical inspection

As a last step prior buying a used car, have the vehicle inspected by an experienced mechanic of your choice.


Do's and Don'ts

- Don't buy a car if you see a smoke from exhaust pipe - only the water steam and water condensate dripping from the tail pipe is OK.
- Don't buy a car if engine knocks or works too noisy.
- Don't buy high-mileage cars. I'd recommend to avoid cars with more than 145,000 - 150,000 miles (230,000 - 240,000km)
- Don't buy cars that have some engine problems even if it seems to be easy to repair
- Do hire someone knowledgeable to have a vehicle inspected before you buy it.


If you are looking for more detailed technical information

If you want to find more technical information about you car such as all kind of diagrams (transmission diagram, engine diagrams, vacuum line diagram, electrical diagram, etc.) repair information, specification, fluids type, maintenance schedule, component location, service bulletins and so on, there is a website which for a small fee allows you to browse all such an information for almost any car model on-line. To learn more visit this page:
Where to find technical information about your car


If this page is too complicated for you, check my other page, written in more simple, easy to understand manner:
How to check a car - simplified version.

Internal combustion engine

The internal combustion engine is an engine in which the combustion of a fuel (generally, fossil fuel) occurs with an oxidizer (usually air) in a combustion chamber. In an internal combustion engine the expansion of the high temperature and pressure gases, which are produced by the combustion, directly applies force to a movable component of the engine, such as the pistons or turbine blades and by moving it over a distance, generate useful mechanical energy.
The term internal combustion engine usually refers to an engine in which combustion is intermittent, such as the more familiar four-stroke and two-stroke piston engines, along with variants, such as the Wankel rotary engine. A second class of internal combustion engines use continuous combustion: gas turbines, jet engines and most rocket engines, each of which are internal combustion engines on the same principle as previously described.
The internal combustion engine (or ICE) is quite different from external combustion engines, such as steam or Stirling engines, in which the energy is delivered to a working fluid not consisting of, mixed with or contaminated by combustion products. Working fluids can be air, hot water, pressurised water or even liquid sodium, heated in some kind of boiler by fossil fuel, wood-burning, nuclear, solar etc.
A large number of different designs for ICEs have been developed and built, with a variety of different strengths and weaknesses. Powered by an energy-dense fuel (which is very frequently petrol, a liquid derived from fossil fuels), the ICE delivers an excellent power-to-weight ratio with few safety or other disadvantages. While there have been and still are many stationary applications, the real strength of internal combustion engines is in mobile applications and they dominate as a power supply for cars, aircraft, and boats, from the smallest to the biggest. Only for hand-held power tools do they share part of the market with battery powered devices.


An automobile engine partly opened and colored to show components
Bookmark and Share
Free Automatic Link Free BackLinks
backlinks free
Free Backlink Plugboard Express Free Auto Backlink AutoBacklinkGratisFree Promotion LinkMAJLIS LINK: Do Follow BacklinkLink Portal Teks TVFree Smart Automatic Backlink Text Backlink Exchanges Free Auto Backlinks Free Automatic Link Free BackLinks
backlinks free
Web Link Exchange Text Back Links Exchanges Text Back Link Exchange Text Backlink Exchanges Kostenlose Backlinks bei http://www.backlink-clever.de Free Auto Backlinks Free BackLinks For You Intercambio gratis de Enlaces Kostenlose Backlinks bei Gratisbude.de Free Auto Backlink Generator Qtul Free Auto Backlinks FreeBackLinksForYou Free Automatic Link DAHOAM Free Backlinks Free Automatic Backlink Linki Linki Free Backlinks Free Auto Backlinks Hochzeitsmusik - Streichquartett http://Link-exchange.comxa.com Free Backlinks Magical Link Free Automatic Elvira Links Unlimited Backlinks MIM - Free BacklinksYour-Link Free Auto Backlinks From 1Malaysia Free Automatic Link Free Backlinks Exchange Free Automatic Link Radio-Antenne-Nord Intercambio gratis de Enlaces backlink Cárdenas.net backlink Free Automatic Link echange de liens Free Automatic Link